
Tutorial of using "AllergyAssist"
Welcome to our tutorial on how to use "AllergyAssist"! We will walk you through how to navigate this app.

01
Install App on your iPhone
To get started simply search "AllergyAssist" in App Store, download the app and install on your iPhone.
02
Open App
There are three buttons on the home page:
-
Users: Click this button to visit user management page.
-
Scan Barcode: Click this button to visit Barcode scanner page.
-
Scan Label: Click this button to visit Label scanner page.


03
User Account Management
For the first time user, there is no user account list on this page. User should click the Add User button on the top right corner to add user who wishes to get allergy assistant from this application.
For the returning user, there are user accounts list on this page. To modify information for any existing user, simply click the Edit button right next to the user name. User also can delete the existing user by clicking the Trash icon or add user by clicking Add User button on the top right corner.
Four navigation icons are shown on the bottom.
04
User Profile
To add new user, simply input the user name and email address.
Once user clicks the Save button on the top right corner, it returns to the user accounts page and the new user account is now list on the user accounts page.
After input the user name and email, user can also click the Set Up My Allergen Profile button to edit My Allergens setting.


05
My Allergens
Major allergens are list on this page. If user wants to add anything else, please scroll down the bottom and add allergens or intolerances separated by comma in the input box next to Other.
For each allergen, user can select one of the three options. Avoid means user has allergy with this allergen; Limit This means user prefers not have this allergen although he/she doesn't have allergy with this item; Can Eat means user has no allergy with this allergen.
Allergen with "+" sign means it is allergen group which contains members. You can make the selection for this group or click the "+" to further explore the members (See Step 06), then make selection for each individual member of this allergen group.
Click Save button to return User Accounts page. Either a new account is added or an existing account has been updated.
DO NOT FORGET TO CLICK SAVE BUTTON!
06
My Allergens - Allergen Group
Members of the Allergen group are list on this page. User is able to make selection for individual member. Once user clicks the Save button on the top right corner, it returns to the major allergen page.
User can always make a selection from four navigation icons on the bottom of page.


07
Scan Barcode - 1
Once you open Scan Barcode page, first click Scan Barcode button. Position barcode in the center of the camera screen and the app would automatically capture the code and display the UPC number in the field beneath the Scan Barcode button.
There are two results user will get. If UPC can't be found in the preset database, a warning message will pop up and suggests to use the ScanLabel Function.
08
Scan Barcode - 2
If the barcode is found in the preset database, the ingredients will display in the third field. Then a User Profile can be selected for checking. Click Check button and the app will check if allergen is contained in the ingredients. It will highlight the allergen if it is found.


09
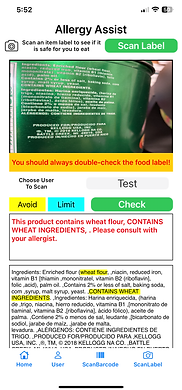
Scan Label
Once you open Scan Label page, first click Scan Label button. Position Ingredients label in the center of the camera screen and the app would use camera to take the photo. Then the image will be displayed in the field beneath the Scan Label button. OCR can convert it to text in the third field. Then a User Profile can be selected for checking. Click Check button and the app will check if allergen is contained in the ingredients. It will highlight the allergen if it is found.
© 2035 by Colin Hu. Powered and secured by Wix